

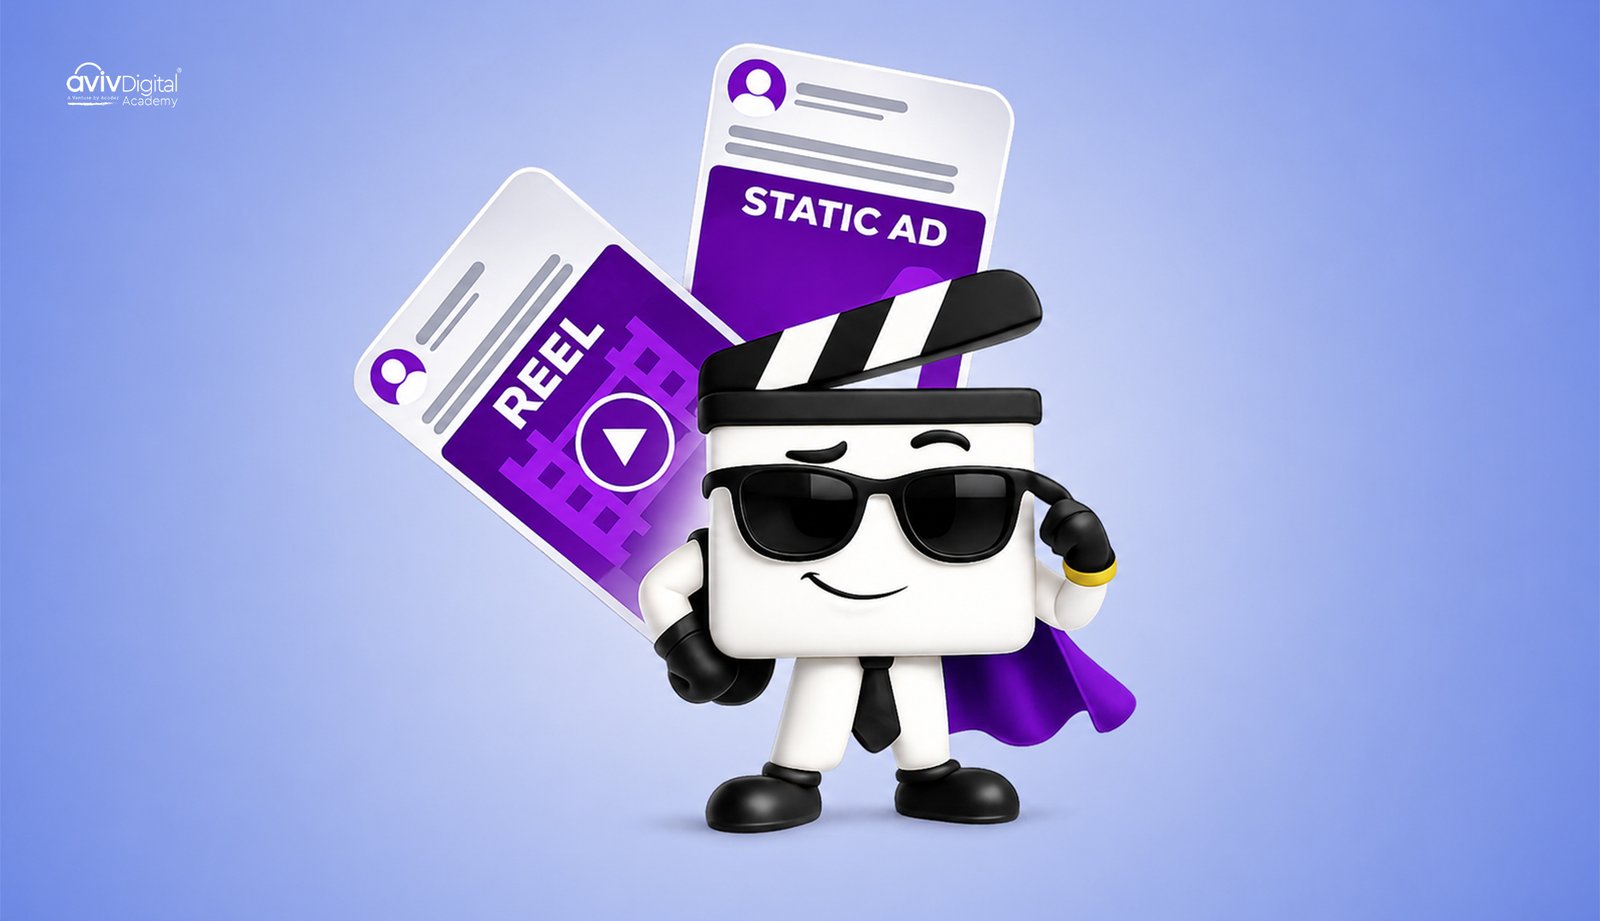
An Ebook is an electronic version of the printed book consisting of text and images that can be read using computers or other electronic devices.
Here, we are going to discuss about Ebook publication that is also know as kindle publishing or self publishing.
So why Ebook and why kindle only.
The first thing about Ebook is that as the current scenario goes on, people are moving more into digitalization and they are now reading books mostly on their mobile phones, smartphones or iPad.
They are very less into printed books and reading them.
So, the cost of the Ebook is also half of the printed books.
That doesn’t mean that printed books are going aways and the printed book industry will be there, that’s not going to go anywhere.
But this particular industry has created an opportunity for new authors, new writers and also an opportunity to reach with their ways to mass communication.
So if you wanted to start your writing journey, then this is the best platform to start with and acquire some trusty audience.
So, later on when you launch a real kind of book or a real industry book where a printed version will be available and you will be marketing it.
This makes you a real author that will boost your cells.
Why Amazon Ebook Publishing?
So let’s discuss about the reasons to choose Amazon and the steps to that show how to publish a book on Amazon.
Why we should go with Amazon is that it’s the world’s largest paid search engine.
It is a kind of search engine where people are searching with a credit card saved on their accounts.
So it is the peak opportunity for us to impress them and to make the purchase within the starting point.
We don’t have to put so much effort to convert them.
They are ready to buy the product which they want.
We just need to show right product, at right place at right time with a right price.
The Kindle of the amazon is a dominating niche for the Ebook session as of now.
So Amazon is the best option to get started with.
When your book gets a good authority and good reviews on Amazon, it actually helps to boost your sells.
Becoming an authority in your niche will also help you to represent yourself as an establish Author in your niche.
Amazon is very easy platform to refer your book to a person and it’s trustworthy.
People believe in it and buy from there.
If I ask you to go to a random site and ask you to buy something from there, you may think twice,
but at same time if asked you to go and buy it from amazon then you will be very happy to go and buy that thing.
So these are the main reason why we should publish digital books with amazon.
Ebook Publishing Setup
We have discussed about the reasons to go to amazon and why to choose kindle. Here, we are going to the next step which is to write the content. There are three different types of format in which we are going to focus on.
The very first one is the vomiting draft. In case of the vomiting draft, you can write whatever that comes to your mind which is related to the topic. Here, you are not going to think about any language issues, grammatical errors or misspellings. These all things we will be detected and rectified in the later processes. But in this process, you must be very much focused on building your outlines. You need to prepare the index pages according to the topics that you are going to cover. You are just framing out the stories and ideas about what you are going to put in our books. Planning the layout of the chapter that you are going to do will be discussed here. This is known as vomiting draft, where you just put whatever ideas that come in your mind.
alsoRead
The second step is to review the draft. In this review draft section, we are going to review the content that we have made in the vomiting draft section. Here, you will be checking the spelling errors, grammatical errors and other different related aspects. You must examine the content at least once and note down the errors that you find in it. Now you will be developing each of them and after that, you can approach some close friends to go through your book and ask them to review the book. You can also ask them about the suggestion of the book and the problems they find in it. All these errors must be checked and rectified before moving to the next section.
Then, the third and final section is the editorial draft. In this particular draft, you are going to make this book as a professional book. Here, you can seek the help of a friend who is good in this particular language. As such, if you have written in English then go with your friend who is good at English and ask him to just go through your topic and give his ideas and feedback. If you don’t have that kind of a friend, then you can hire a professional editor who can do these types of jobs. You can get different editorial experienced people as temporary or permanent. Along with that many freelance editors are available n. You can show them your drafts and they will just go through it and suggest changes that should be made. For a better experience, it is good to opt for an experienced person. All the major and minor editorial work will be done by him. This is the editorial draft section.
If you are not able to sit and write the content, then you can seek a good content writer for writing the content. You can make some audios or videos of the content and send to the content writer. He will transcribe and polish it in a style that you actually needed. So you don’t need to worry about writing the content, you just need to hire a good content writer. He will even write a book for you in needed situations. You just need to take that book and follow the next steps and finally, you can publish the book.
Formatting and design
We have discussed about the content part and gone through all the major checkups in the previous chapter. Now, you are going to form your book as an Ebook. For this purpose, you require three different platforms. The first one is to format your content design.
You can use the Kindle Create, which is the Kindle’s own software to format your content design. The Kindle Create can be downloaded in both windows and mac operating systems by clicking the appropriate buttons such as Download for PC and Download for Mac as shown figure 6

Figure 6
Kindle Create makes an opening screen as shown in figure 7. To launch a new project click on the New Project Form File Button. You can also launch a new project by selecting New Project from the File.
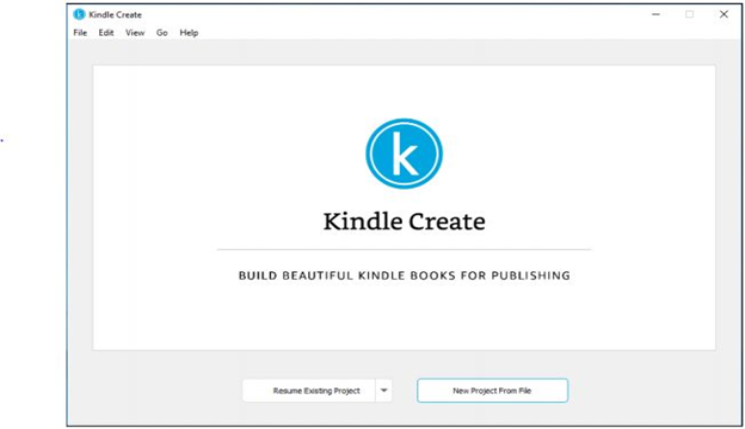
Figure 7
Click on the Choose File button(see Figure 8), select the file to upload and click open. You have the option to choose .doc and .docx file. If you have written it in the google docs, then you can download it to your system and choose the file.

Figure 8
Once you open a file, Kindle Create converts the file into a Kindle formatted Ebook. The conversion optimizer line spacing, margins, fonts, style and other characteristics for better reading on electronic devices.
When the conversion is completed, the Import successful! dialogue box gets displayed on the screen as shown below in figure 9. Click the Continue button to proceed.

Figure 9
An Automatic Chapter Titles dialogue box will be displayed as shown in figure10. By clicking the Get Started button, Kindle Create starts applying the chapter title to your book.

Figure 10
Kindle Create will automatically find and apply potential chapter title elements in your book. You can review and approve the suggested titles made by the Kindle Create.
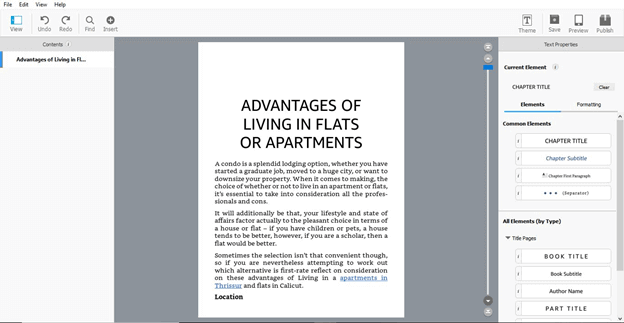
Figure 11
Select File > Save Project As to save your uploaded book (see Figure 11). The Save As dialogue box appears and navigate to the location where you want to save the file. Enter the file name and click the save button. You change the font, adjust the size, align the sentence and also all other editing works can be done on this platform. When you complete the entire editing works, then you can directly publish your book to Kindle. This is free of cost, you don’t need to invest any amount to acquire this type of software and you can create a set of topics for your Ebook.
Designing and Publishing
In the second formatting, you need to design the cover of your book. There are some basic requirements that you need to follow in the case of cover. The height vs width ratio should be 1.6: 1. This is the ideal size of the book and you must follow this size. You should also make sure that your book is not more than 50mb. You can use the file formats like JPG, TIF, and TIFF.
alsoRead
Here also you are having an option from the Kindle sites to use their own platform to create your design.
This is the welcome page of kindle direct publishing (see Figure 12). Click on the Sign in button. Using your Amazon account’s username and password you can log in to your KDP account.
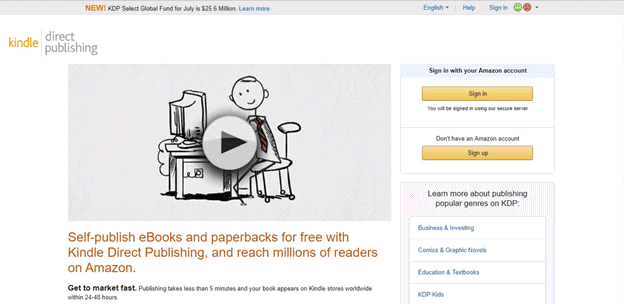
Figure 12
up an eBook and the other one is the paperback setup. (see Figure 13). So firstly you can click on the Kindle eBook and publish your eBook.

Figure 13
So this will take you to an eBook set up page as shown in Figure 14. This setup will be having three tabs like details, content, and pricing respectively. You need to fill all the details related to your book in this Kindle eBook Details tab. Here, you need to submit the details of your book such as language, title, sub-title, edition number, author name and so on. You can attach a short description of your book in this section, which may help the customer to know the thread of your book.

Figure 14
You are also having the option to add the keywords related to your book. So add the keywords which can bring more customers to your book. You are also having the option to categorize your book, ie in which category your book lies. If your book is related to finance, then you can opt for finance as the category and people who search for finance category books may view your book.
If your book is having any restrictions or if it is written for a specific aged people then you can customize it from this eBook details tab.
After submitting all the details of your book, click on the Save and Continue button (see figure 15).

Figure15
After completing the eBook details tab, the eBook content tab will be displayed on the screen (see Figure 16). The content tab is the place where you apply the cover or design your cover using the cover creator tool.

Figure 16
Digital Rights Management (DRM) is intended to inhibit the unauthorized distribution of the Kindle file of your book. You can enable or disable the DRM by clicking the Yes or No radio button (see Figure 16). You can upload your eBook manuscript by clicking the Upload eBook manuscript button.
After DRM the next option is to launch the cover for your Kindle eBook. For a good reader experience, your book should always have a good cover. You can upload your own eBook cover or design using the Cover Creator Tool.
Click on the Launch Cover Creator button to create the cover for your eBook (see Figure 17).

Figure 17
By clicking the Launch Cover Creator button a dialogue box appears as shown in Figure 18. By clicking the Continue button you can proceed.
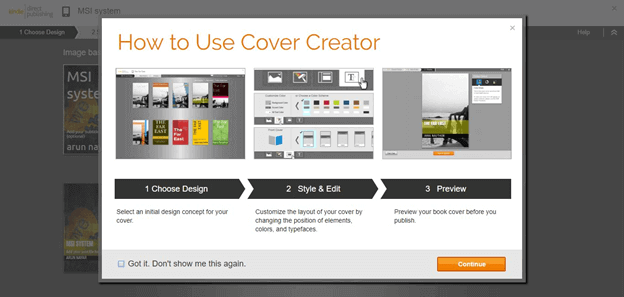
Figure 18
Here, you are having the option to select an image from the image gallery or to upload an image from your system (see Figure 19).

Figure 19
By clicking on From Image Gallery, you can select the image that you require for your eBook cover. Here, the images are categorized into different categories for ease of use (see Figure 20).
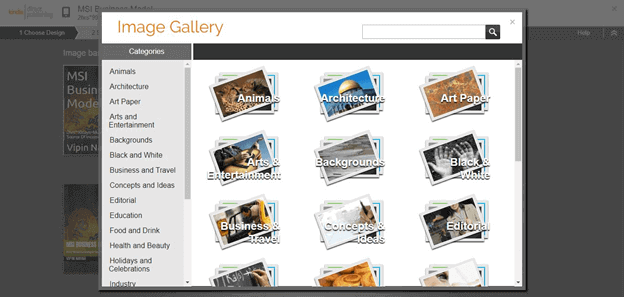
Figure 20
Click on the image which is suitable for your eBook cover. After clicking on the image, a new screen appears as shown in Figure 21. Click on the Use this Image button to proceed.

Figure 21
A design of the eBook cover will be shown based on the image you selected. If you have a better design in your system then you can opt that one. Here, you will be having some suggestions by Kindle and you can choose any of them.
After selecting the cover edit section will be opened to choose colour, layout, and fonts (see Figure 22).
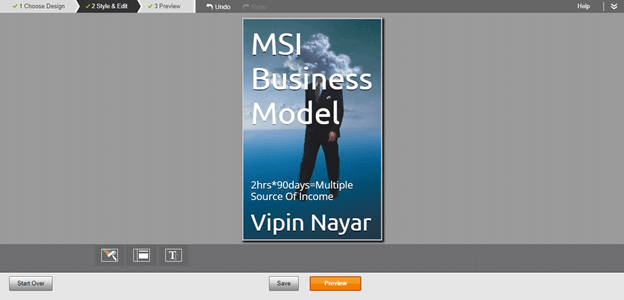
Figure 22
If you have completed the editing and styling works, then you can click on the Preview button to see a preview of your eBook cover.
If you are happy with this cover, then click on the Save & Submit button to continue or else click on the Start Over button to redesign the cover of your eBook (see Figure 23).

Figure 23
After submitting the cover, a Cover uploaded successfully! message gets displayed on the tab as shown in Figure 24.
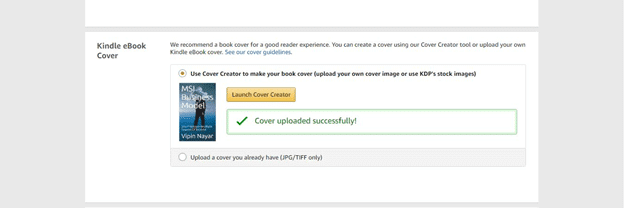
Figure 24
You can launch the preview of your book by clicking on the Launch Previewer button (see Figure 25).

Figure 25
The preview of your eBook will be shown as in figure 26. It lets you know how your book will appear on the reader’s tablets or phones.

Figure 26
If you are having an International Standard Book Number (ISBN), then you can fill the details in the Kindle eBook ISBN section (see Figure 26). ISBN is an optional section where you can publish your book without an ISBN. If you complete the content part then click on the Save and Continue button to proceed to the next step.

Figure 27
The next part is the Kindle eBook pricing where you submit the pricing details and publish your Kindle eBook. You can enroll your book in the KDP select by clicking the checkbox (see Figure 28). KDP select helps you to reach more customers and earn more money.
Here, you are having the option to select the territory. If you are having worldwide rights, then you select All territories or else select Individual territories.
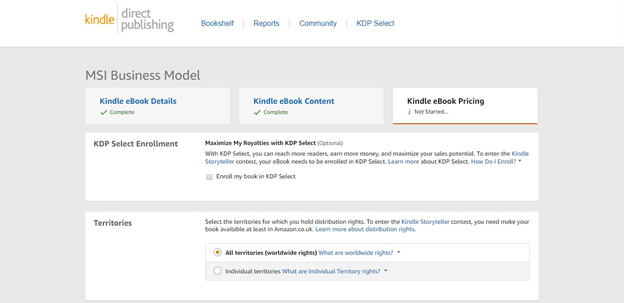
Figure 28
After choosing the territory you can submit the royalty and pricing of your eBook. The price range will be based on the royalty plan you selected and the size of the converted book. Choose the royalty plan by clicking the radio button (see Figure 29) and also set the price of your eBook.

Figure 29
By completing the pricing details, you are having the option to enroll your book in Kindle Matchbook. If you like to enroll, then click on Enroll my book in Kindle Matchbook or else leave it (see Figure 30). Next, you are having the option to Allow Kindle Book Lending which allows the customers to lend your Kindle eBook to their friends or family after purchasing. You can select it or avoid it according to your interest.

Figure 30
After submitting all the details, read the KDP Terms & Conditions and click on the Publish Your Kindle eBook button to publish your eBook. It can take up to 72 hours for your title to be available for purchase on Amazon. If everything is fine, you will get a dialogue box displayed on the screen saying Your Kindle eBook has been submitted.
Now let’s set up the paperback of your book. Click on the Start your paperback button or select Paperback from the Bookshelf. The paperback setup also has three tabs as the eBook setup.
The first one is the Paperback Details tab where you can enter all the details related to your book (see Figure 31). It is similar to the details tab of the eBook. Here, you need to submit the book title, subtitle, description, author name, category and so on.
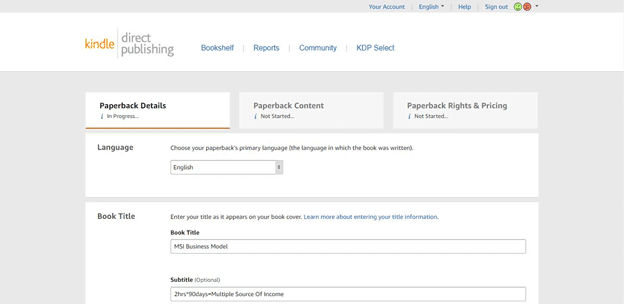
Figure 31
After submitting all the details of your book, click on the Save and Continue button to proceed to the next step (see Figure 32).
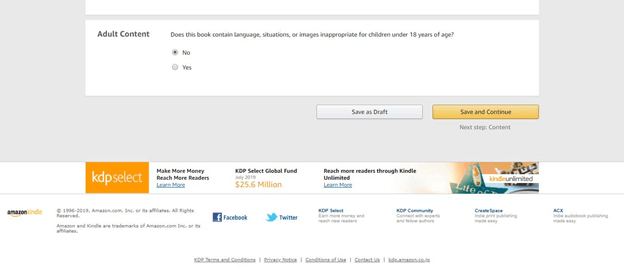
Figure 32
Next is the Paperback Content tab, where you can submit the content details and design your book (see Figure 33). If you have an ISBN number then you can enter it here, or else you can take a free KDP ISBN. You can set up the publication date, design the interior of your book and select the paper type for your book from here.
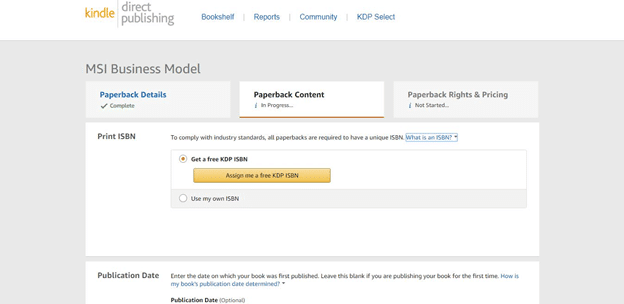
Figure 33
Click on the Upload paperback manuscript button and upload your paperback manuscript to Kindle (see Figure 34). After uploading it you can design your book cover with Launch Cover Creator tool as you have done for the eBook. If you are already having a cover then you can upload it here.
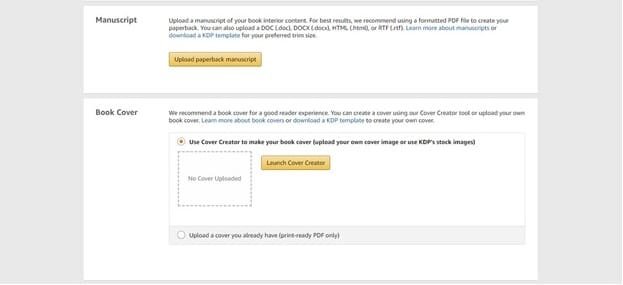
Figure 34
You can click on the Launch Previewer button to preview your book (see Figure 35). All the errors will be detected and shown to you by the previewer. If all the details are submitted, click on the Save and Continue button to proceed.
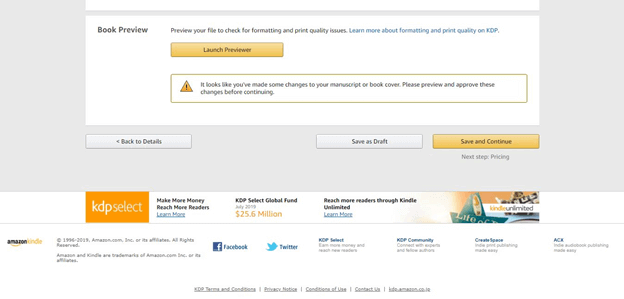
Figure 35
The next one is the Paperback Rights & Pricing tab where all the pricing details need to be mentioned.
Here, you can submit the royalty and pricing details. You can fix a proper price for your book and you can see the royalty amount that you will be receiving for each book. The printing charge of your book will be also mentioned here. There is also an option for you to expand the marketplace. It will show other marketplaces of Amazon where you can sell your book.
Click here to request a proof copy is the clickable link which will give you a proof copy of your printed book. You can purchase this through your Amazon account.
If you have submitted all the details of your book, then read the Terms & Conditions of the KDP and publish it.
The publishing team will review your book details such as content and quality. It will take about 72 hours for your book available for purchase on Amazon. At the time of review, your book will appear on review in the Bookshelf. You can change your content, title, pricing after the review.
So this is the process of publishing your book on Kindle as well as a Paperback in Amazon.
How to find a good topic
Here, we are going to discuss the ideas to find a good topic for your book.
For this purpose, first, you must go to Amazon.com and change the department to the Kindle Store (see Figure 36).

Figure 36
Before typing a keyword in the search box, you need to attach an extension called ‘DS Amazon Quick View’ to the chrome. You can get this extension by searching in the web store. Click on the Add to Chrome button to add this extension (see Figure 37).

Figure 37
This is a product tracking extension for Amazon, that allows you to have a quick view of the product information, such as sales ranking, customer rating and more information on the Amazon index pages.
After adding the extension to the chrome, you can search the keyword that you are searching for in the Kindle store. You need to look into two things, first is the search result. The search result should be always less than a thousand, which means there is an opportunity for you to build an eBook and make it profitable. The second thing is the ranking of the book. The Kindle store ranking of the book should be less than one lakh. While searching the keyword, you should make sure that your topic is coming in the first five or ten results.
You can check the keyword is profitable for you or not, with the help of the Amazon Book Sales Calculator. You can browse this from google and use it. You need to copy the ranking of the specified book from Amazon and paste it in the BSR RANK option (see Figure 38). By clicking the CALCULATE SALES button, you can know the sale of the book per month and per day.
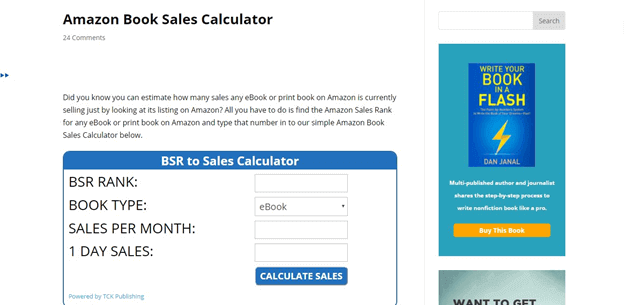
Figure 38
Now, you can check the cost of the book and multiply the cost of the book with sales per month to know the amount that the publisher receives per month. Like this, you find the best topic and calculate the amount the publisher receives. Thus you will get a profitable topic and can go ahead with that. This is one of the ways for selecting the keyword-based on the keyword.
There is another way to select the best topic for your book. You can go to the Kindle store and select the Bestseller section from there. The books shown in the bestseller section are the top-rated books on Kindle. This list will be updated hourly based on the sales. You can change the department according to your convenience and view the top-rated books in a particular department. You can find the market value topics from here and write the books on that topic. If you find a good keyword in the bestseller section, then put the keyword in the amazon books section and check the quality of the keyword in the paperback section too.
You can also put the keyword in the Amazon audible and check the quality of the keyword from there also. The audible books are not supported in India, if you have a US address, as well as a US, paid account, then only you can publish a book on audible.
Before making a book you should go through these basic searches to acquire some good profitable keywords and then you can write a book on that particular topic.
Aviv Digital is one of the leading digital marketing training institutes in Cochin, Kerala. We offer a wide variety of globally recognized certification programs which include SEO, SEM, SMM, Email Marketing and Inbound marketing course. For more details, Contact us at +91 8157998844


1 Comment
Hello, yes this paragraph is truly nice and I have learned lot of things from it on the topic of
blogging. thanks.